In nearly every environment I’ve walked into, especially those that are more mature (read: older), DNS contains a plethora of stale entries, whether statically configured and forgotten about or dynamically registered, but never deleted or scavenged. Most of those environments could benefit from implementing Active Directory DNS Scavenging.
For some environments, especially smaller ones where network changes are somewhat infrequent, this may not be a big deal. However, as devices are connected, moved and ultimately disconnected, DNS records can begin to sprawl. Your users could begin to experience issues with name resolution, causing problems with accessing certain hosts, services, and resources on your network.
Assuming your Active Directory is already set up, with the requisite domain, zone, and name servers configured, there are a few items within DHCP and DNS you’ll want to configure. It only takes a few minutes and may save you from a headache or two down the road.
DNS records
Dynamic DNS records
In a typical environment, it’s common to see a network configured where a dynamic record can be registered by a client itself, or by the DHCP server(s) on behalf of a client. In most cases, as long as the device is powered on and connected to your network, this registration process will occur roughly every 24 hours, keeping the dynamic record fresh and active in DNS.

This Wisconsin manufacturer needed to modernize its IT infrastructure to support rapid business growth.
Discover what they didStatic DNS records
From time to time, we admins will set up static records. These can be simple host (A) records for a device like a network printer or copier. These could be CNAME (alias) records for web servers. These could be SRV records for servers like Exchange. A static record can be created for just about anything.
DNS aging and DNS scavenging
Microsoft DNS contains a feature called DNS Aging and DNS Scavenging. At a high level, the aging process compares the age of a DNS record to that of refresh and no-refresh interval values you configure. If the record is older than the aging values, the scavenging process purges it from DNS. If not, the record remains.
By default, DNS Aging and Scavenging will ignore static records. However, DNS Aging and Scavenging can be configured to process static resource records in addition to dynamic resource records. If you choose to do this, you need to exercise some caution, as the timestamp (or age) of a static record doesn’t typically change. If you registered a new record 365 days ago, as far as DNS scavenging is concerned, the record is 365 days old, and will be purged.
For this reason, it’s good practice to simply manually review your static records on a periodic basis to keep things clean. How often you do this is up to you and should be based on the number and frequency of changes you make to your network.
Recommended DNS aging and scavenging values
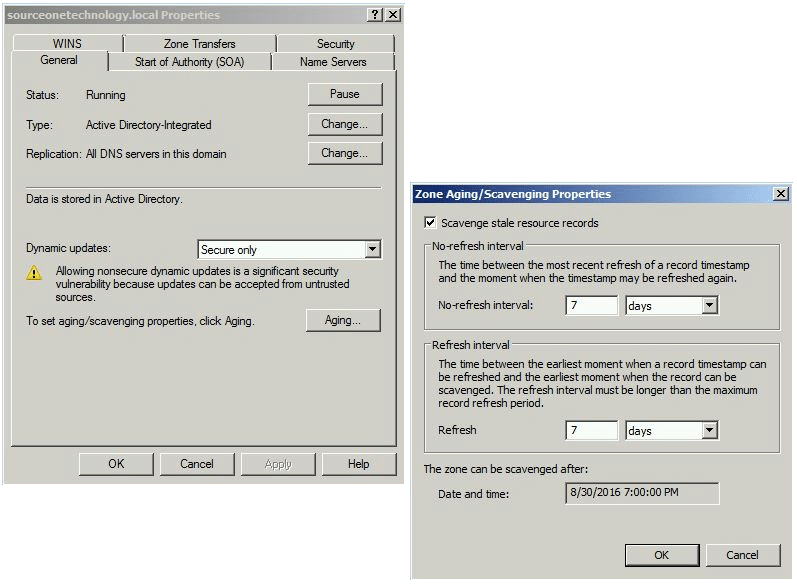
The values you choose are up to you and your environment. If you simply select the defaults, 7 days no-refresh and 7 days refresh, a DNS record has the potential to age to 14 days old before becoming stale.
If your scavenging period is set to the default setting of 7 days, the records are purged only once a week. Your DNS record can now exist for a period between 15 – 20 days.
The no-refresh interval means the timestamps on your DNS records cannot be refreshed. Your clients will still dynamically register with DNS, but the timestamp won’t update. This simply reduces replication traffic between your DNS servers.
The refresh interval means the DNS record timestamp can now be updated at the next dynamic registration cycle. This gives the client a grace period to dynamically register and refresh its record before it’s marked for deletion. If it’s connected to your network, no problem. If not, the clock is ticking.
For most scenarios, I’ve found it best to configure the sum of the aging and scavenging periods’ refresh and no-refresh intervals to match the duration of your DHCP leases (e.g. the no-refresh interval and the refresh interval equal your DHCP lease time). I set the scavenging period to occur daily.
With this method, I never end up with duplicate or stale entries in my DNS.
Configuring DNS aging and scavenging
The DNS Aging and Scavenging settings should be defined in three places—scavenging on the server node directly, aging on any zones for which you wish to scavenge, and optionally deletion on the resource records themselves*.
To enable scavenging on a Microsoft DNS server running Windows Server 2008 or newer, open up your DNS management console and connect to an authorative DNS server.
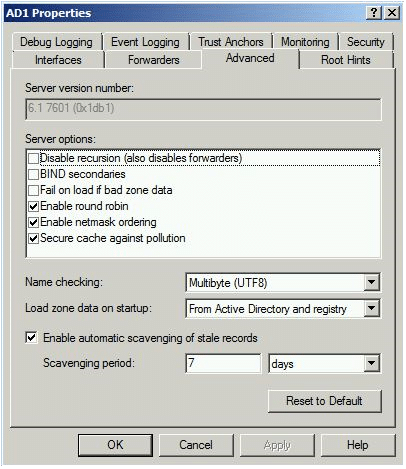
Right-click the server node and click Properties. Select the Advanced tab, then place a check in the Enable automatic scavenging of stale records box. Set your scavenging period, and click OK.

(Your scavenging period simply defines how often the process will run, akin to a scheduled task.)
This will be the server that performs the scavenging process. You only need one.
To configure aging settings on your zones from within the same DNS management console, right-click the DNS server and select Set Aging/Scavenging For All Zones.
Alternatively, if you prefer to set the values per-zone, right-click the zone and click Properties. Select the General tab, click Aging, and place a check in the Scavenge stale resource records box. Set your No-refresh interval and your refresh interval, and click OK. Don’t forget your reverse (PTR) zones!

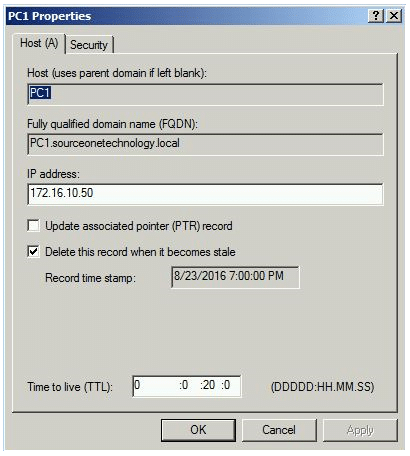
Finally, if you need to configure resource record settings, you need to enable the advanced view in your DHCP management console. Click View, then Advanced. At this point, you can right-click a record, select Properties, and place a check in the Delete this record when it becomes stale box.

*Once you’ve enabled DNS Aging and Scavenging on your server(s) and zone(s), dynamic records will be subject to deletion per your aging and scavenging properties. Static records will not.
As long as your DNS is Active Directory-integrated, the aging settings will replicate across all of your DNS servers.
DHCP and DNS integration
In a typical out-of-the-box Active Directory deployment with Microsoft DHCP and DNS, certain levels of integration are enabled. One of these is to allow Microsoft’s DHCP server to perform dynamic DNS registrations on behalf of a DHCP client. The DHCP server will dynamically delete corresponding DNS records as well, upon lease expiration. The process works well in most cases and keeps DNS clean.
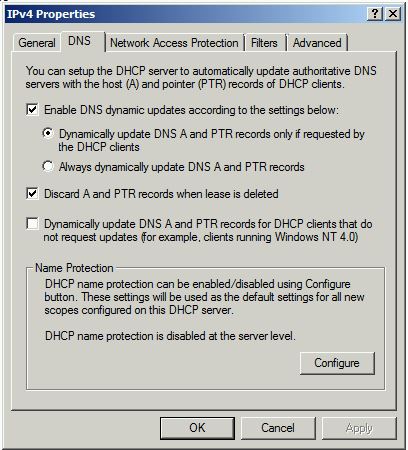
To ensure your Microsoft DHCP server is configured to perform dynamic DNS updates, open your DHCP management console and connect to an authorized DHCP server(s) on your network. Right-click your IPv4 and/or IPv6 listener(s) and click Properties. Select the DNS tab, and ensure the box to Enable DNS dynamic updates is checked. Ensure Discard A/AAAA and PTR records when lease is deleted is checked as well.

From within the same DHCP management console, right-click each scope, click Properties, select the DNS tab, and ensure the same options are configured.
Additional recommendations
If you have a larger environment with many DNS records, you may want to test the aging process before you enable scavenging. You can configure aging on your DNS zones and records, but not enable scavenging on the server. This will give you time to ensure the aging values you set up will work for your environment. If everything looks OK after a couple of weeks of testing and checking, you can backup DNS and turn on scavenging.


